 |
FLO Headworks: |
|
|
| ||||||||
|
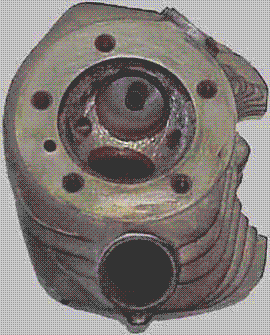
If you ride a Pan or a Shovelhead you’re
probably tired of exhaust leaks or pipes that won’t stay on the heads,
Panhead spigots always wearing out, and clamps that won’t tighten up.
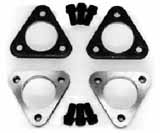
These problems always seems to happen at the wrong time or place. Shovelheads eventually strip their threads and helicoils don’t help for long. If you want a temporary solution we can replace Panhead spigots with 6061 aluminum alloy, if you want to keep the stock look. Or try the Shovelhead fix with an 1 3/4" long stud buried up in the casting. After doing a few hundred of these over the years, we decided to come up with a permanent solution to these exhausting Pan and Shovel problems. We had seen some poor attempts at welding flanges on Shovelheads using three bolts. So we thought, why not make some flanges out of really good aluminum and regular automotive header bolts? We started talking to people about it and the next thing you know it was actually happening. A couple more months of work and we had one really nice flange kit. Our aluminum alloy flanges are top quality: cast from 356-grade material and hardened for maximum strength and weldability. The steel and aluminum flanges are matched and machined together for a more precise fit. They will fit together only one way and are marked on one side with a blue line. These puppies will last until hell freezes over. Our 3-Bolt Exhaust Flange Kit will fit both Panhead and Shovelhead engines. Shovelhead exhaust pipes work well on both models. Welding them on your heads can be tricky but a good welder that is experienced in welding H-D castings should have no problem. Or we can do the job for you. If you want to do install the kit yourself, no problem! We have put together six pages of installation instructions with three pages of photos to make sure you get it right the first time. Following are excerpts from the instructions for the Panhead installation of the 3-Bolt Exhaust Flange Kit, to give you a basic understanding about the procedure. If you’ve got a Shovelhead, the preparations are identical except that there are no spigots to remove. 1. Heads must be clean and free of oil and carbon especially in the area to be welded. Remove existing spigots with a hacksaw. A disc grinder can be used to finish the cut cleanly. With the grinder |
rough up
the casting approximately 1/2-inch into the port. At a 45-degree angle,
grind a 1/8-inch area at the edge of the inside of the port for welding.
The next step requires a short, straight piece of pipe, 1 ¾ inch by approximately 4 inches long. 2. Now take one flange assembly and line it up on the head, then insert the short pipe and hammer it in slightly. It will hold the flange in line. 3. Check to be sure that the flange is flush against the head. The flange should rotate freely on the pipe. The location of each flange is important. Using a square on the rear head, line up the flange at 90 degrees to the head surface with the blue line on the 90-degree side of the flange. 4. Before welding, all areas to be welded should be roughed with a grinder, especially if the head has been glass-beaded. A short area on each flat side of the alloy flange must be welded first. 5. Tack one side securely and check to be sure the flange is flush with the head. It may be necessary to use a hammer to make adjustments before completion of all three tacks. 6. Now remove the short pipe and the steel flange and you are ready to finish welding. Our instructions recommend 200-plus amps for adequate penetration. The puddle should be approx. 1/2-inch wide on the inside of the flange and 1/4inch wide on each flat side of the outside flange. 7. After the welds cool (naturally) it may be polished lightly. 8. Location of the flange on the front head is done with the square. Line the square up across the valve guide holes and the flange parallel to the head surface with the blue line against the square. Our instructions go on to explain some minor clearance needed for the cylinders and exhaust pipe installation for both pans and shovels. A three-point mount is necessary on both exhaust pipes to insure against vibration damage. Our 3-Bolt Exhaust Flange Kit isn’t a quick or temporary fix. The end result is an awesome exhaust manifold system. It works great and is guaranteed to hold for years to come. For further info contact the FLO Headworks customer service hotline, 805-481-6300. |
|
Transition to 3-Bolt Exhaust Flange Kit |
3-Bolt Exhaust Flange Kit |
|
Related Products
|
|
|
© 2000-2014, FLO
Headworks. Contact Perry Kime at 805-481-6300 or via
e-mail. |